Route Requests to the Right People: Conditional Recipients
“If the caller mentions Mareike Maier, the email goes to Mareike”: how to route requests to people and branches based on conditions.
In the app: AI Telephony → Overview → Functions → Requests → Recipients tab
A request's default distribution list works well – but why should the whole company read a callback request that's clearly meant for one person or one branch? With conditional recipients, Callana routes requests precisely: if a condition matches, the email goes only to that recipient; otherwise it goes to the default distribution list. You write the condition in plain language.
How it works
- On the Overview (“Übersicht”), open the Functions card (“Funktionen”) → Requests (“Anfragen”) and select the request you want (e.g., “Callback request”). Switch to the Recipients tab (“Empfänger”).
- Click + Add recipient (“+ Empfänger hinzufügen”) and fill in the three fields:
- Label (“Bezeichnung”) – who or what this is, e.g., “Mareike Maier / Vienna branch”
- Email address (“E-Mail-Adresse”) of the recipient
- Condition (“Bedingung”) in plain language – when this person should receive the request, e.g., “if the caller mentions Mareike Maier”
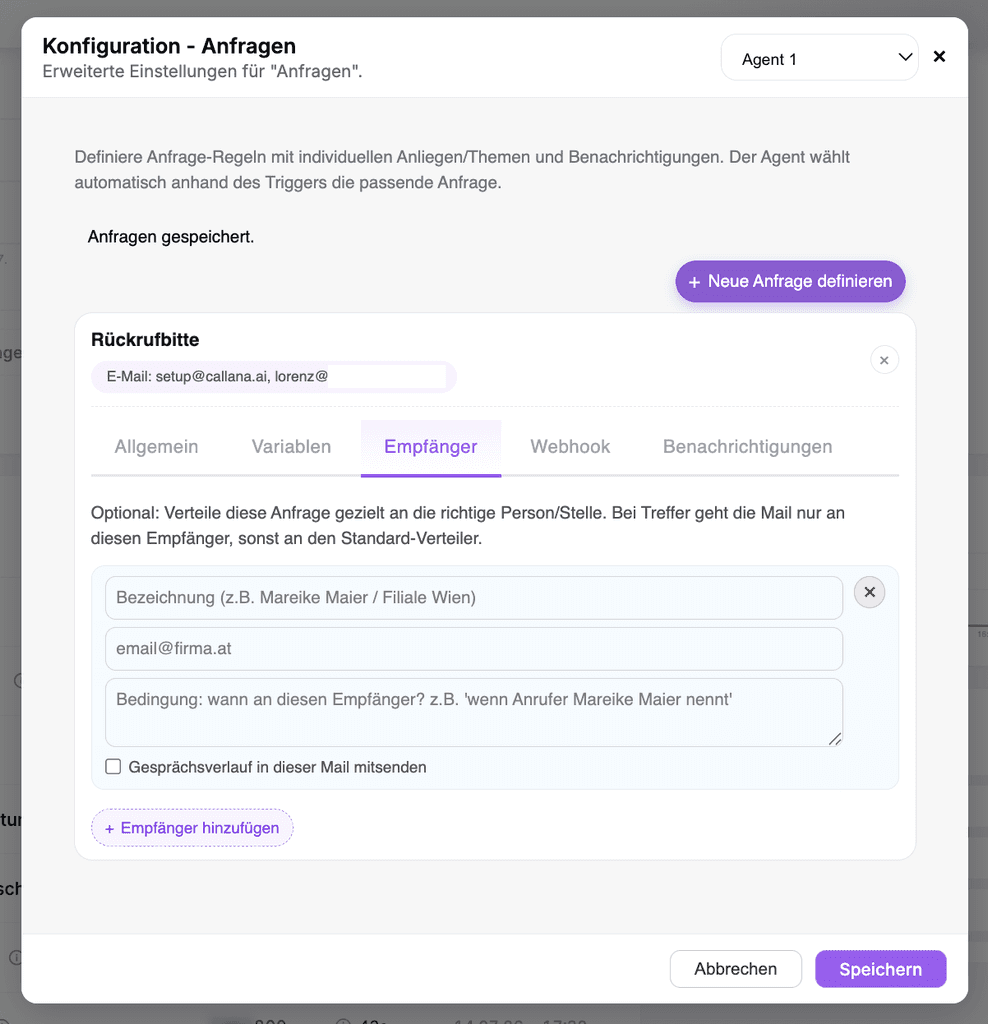
- Optional for each recipient: check Include call transcript in this email (“Gesprächsverlauf in dieser Mail mitsenden”) to attach the transcript.
- Add more recipients if needed and save.
From now on: if a condition matches, only that recipient receives the request. If none matches, it goes to the default distribution list from the Notifications tab (“Benachrichtigungen”) as usual – so nothing ever gets lost.
A real-world example
A chain with three locations sets up one recipient per branch: “if the caller mentions the Graz branch” → email to the Graz address, and the same for Vienna and Linz. If the caller doesn't name a location, the request lands in the central inbox. The result: most requests arrive right where they'll be handled – and head office only reads what's genuinely unclear.
Where: AI Telephony (“KI-Telefonie”) → Overview → “Functions” card → Requests → open the request → Recipients tab
Good to know
- A match replaces the distribution list – it doesn't add to it: When a condition matches, the email goes only to that recipient. If head office wants a copy, add the head office address to that recipient as well.
- Write conditions as you would brief a new employee: Names, branches, topics – the more specific the sentence, the more accurate the routing. The principle is the same as with call forwarding triggers.
- Transcript control per recipient: The boss may want just the key facts, the service team the full conversation – you can have both at the same time.
- Test it: Call in and state the condition word for word (“I'd like to speak with Mareike Maier”) – you'll see right away whether delivery works.
Last updated July 17, 2026
Related
- Define custom requests: turn calls into structured emailsChoose which requests your agent captures, what details it asks for, and who gets them by email or SMS – including a confirmation text to the caller.
- Transfer calls to the right person with schedules and alertsSet up multiple transfer destinations with plain-language rules, time windows and notifications – your agent automatically puts callers through to the right person.
- Create & manage groups: rules for many contacts at onceGroups bundle contacts under shared rules: a custom greeting, transfer to a number or agent – or blocking.
- Forwarding Rules: Contact vs. Group – Which One WinsOff, Number or Agent: forwarding rules can be set per contact and per group. Here's how they work together – and which rule takes priority.