Define custom requests: turn calls into structured emails
Choose which requests your agent captures, what details it asks for, and who gets them by email or SMS – including a confirmation text to the caller.
In the app: AI Telephony → Overview → Functions → Requests
With requests, your agent turns what callers want into structured messages you can act on right away: callback requests, appointment requests, fault reports – whatever your callers need. You describe in one sentence when a request applies; the agent recognizes the caller's concern during the conversation and automatically picks the right request. You decide what information it collects and who gets the result.
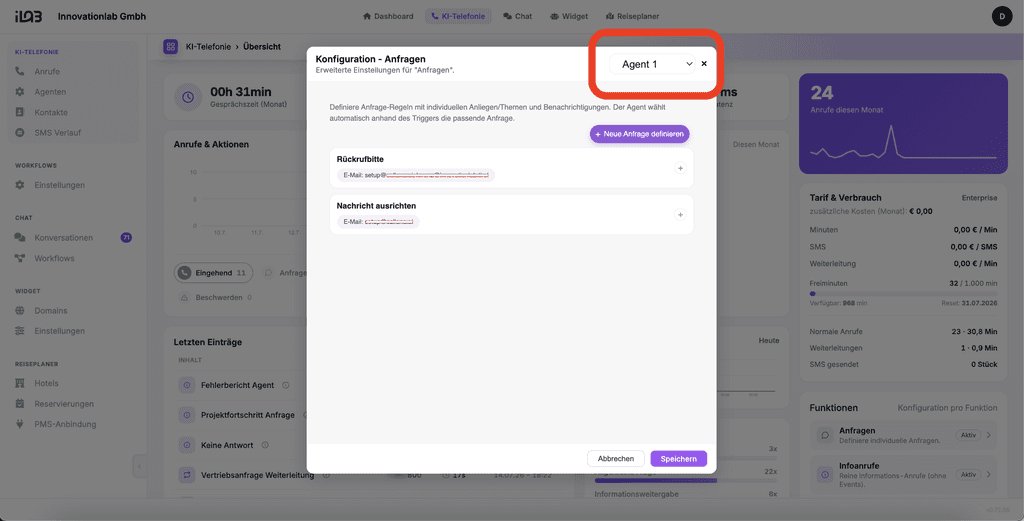
(Is the right agent selected in the top-right corner of the window?)
How to set it up
- Open the Overview (“Übersicht”) and, in the Functions (“Funktionen”) card, click Requests (“Anfragen”). In the top-right corner, choose the agent the request should apply to.
- Click + Define new request (“+ Neue Anfrage definieren”).
- General tab (“Allgemein”): Enter a Label (“Bezeichnung”) – an internal name that shows up in logs and emails, e.g. “Callback request”. Under Trigger / Condition (“Trigger / Bedingung”), describe in plain language when the request should be used, e.g. “When the caller wants a callback.” [Screenshot: General tab with the label “Callback request” and the trigger field]
- Variables tab (“Variablen”): Specify which details the agent should ask the caller for. For each variable: a key (e.g.
name), a description (“Caller's name”), the type, and whether it's a Required field (“Pflichtfeld”). The agent always asks for required fields during the call – optional ones only if they come up naturally.
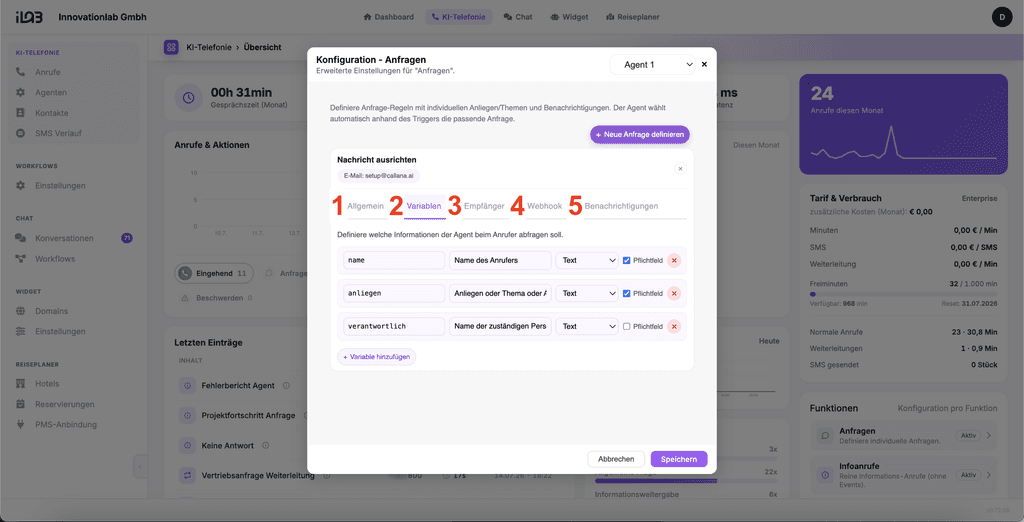
- Recipients tab (“Empfänger”, optional): Route requests to the right person or location. Enter a label (e.g. “Mareike Maier / Vienna branch”), an email address and a condition such as “if the caller mentions Mareike Maier”. If it matches, the email goes only to this recipient – otherwise it goes to the default distribution list.
- Notifications tab (“Benachrichtigungen”): Enter the default distribution list – several email addresses or SMS numbers, separated by commas or semicolons. Optionally turn on Include conversation history in email (attaches the transcript), Send confirmation SMS to caller and SMS on errors.
- Save (“Speichern”). From now on, the agent recognizes the request during calls and captures it automatically.
Real-world example
A physical therapy practice can't pick up the phone during treatments. The agent captures callback requests with the caller's name as a required field plus the best time to reach them. The front desk gets the email with the full transcript – and the caller gets a confirmation text, so she knows she'll be called back. No lost calls, no sticky notes.
Where: AI Telephony (“KI-Telefonie”) → Overview → “Functions” card → Requests
Good to know
- Write triggers the way you'd explain them to a new employee. The agent uses this description to pick the right request on its own – the clearer the sentence, the more accurate the match.
- You can create multiple requests per agent (e.g. callback request, appointment request, fault report) – the agent tells them apart by their triggers.
- Captured requests appear on the Overview under Recent entries (“Letzte Einträge”), where you can mark them as done or hide them.
- In the Webhook tab, you can also pass captured requests automatically to your own systems.
- Confirmation and error texts cost extra per SMS – you can keep track under Plan & Usage (“Tarif & Verbrauch”).
Last updated July 16, 2026
Related
- Route Requests to the Right People: Conditional Recipients“If the caller mentions Mareike Maier, the email goes to Mareike”: how to route requests to people and branches based on conditions.
- Transfer calls to the right person with schedules and alertsSet up multiple transfer destinations with plain-language rules, time windows and notifications – your agent automatically puts callers through to the right person.
- Free Minutes, Usage & Costs ExplainedFree minute allowance, per-minute rates, call transfers and SMS: how to read the Plan & Usage panel and keep your costs under control.
- Block callers: how to set up a blacklistSend unwanted numbers to a busy signal: create a blacklist group, turn on “Block calls”, assign contacts – done.